Tuesday, 23 November 2010

Macaron Times

Ah.. I've always wanted my own macaron stack...

This is a post I've been meaning to do in a loooong time (But was just too lazy to). I have previously tackled the dreaded challenge that is the french macaron. Of course, having read absolutely nothing but the recipe, it was a failed attempt.
After a year or so's greiving, I finally managed the pluck up enough courage to try it again. I searched for help and hints from numerous websites and blogs and my research seems have paid off!

These were the babies in the oven! Developing beautiful feet, luckily. I feel such pride when I watch them rise. They're pretty darn cute as well, no?

Nice dry bottoms!

Where have the feet gone?? A mystery yet to be solved...


Macarons:

Ingredients:
225g icing sugar
125g ground almonds
110g egg whites
30g granulated sugar
A pinch of salt

Method:
1) Draw a template for piping the macarons on a piece of parchment paper. These should be circles measuring about 3cm in diameter.
2) Sift the ground almonds and icing sugar together. Set aside.
3) Whip the egg whites and salt on medium speed until foamy. Increase to high speed and gradually add the granulated sugar. Whip to almost stiff peaks (Don't overbeat)
4) Gently fold in the dry mixture to the egg whites until completely incorporated. The batter should flow like magma when it's done. However if you are unfamiliar with magma (as I am), drop some of the batter onto a plate. If the top flattens on it's own, it's ready.
5) Put the batter into a piping bag and pipe onto the parchment paper. Tap the underside of the baking tray on the countertop and let dry at room temperature for 30 minutes.
6) Bake at 160 degrees C for 10-12 minutes. Let cool before assembling. (Mine took about 15 minutes :S)

Chocolate Ganache

Ingredients:
60g heavy cream
80g bittersweet chocolate

Method:
1) Combine the two ingredients over low heat and stir until combined.
2) Let it cool until it is firm enough to put in a piping bag.
3) To assemble, pipe a blob of ganache onto a macaron shell (Be generous about it!). Sandwich with another shell of a similar size.


Friday, 5 November 2010

A Basic Loaf

Long time no blog, buds! And if anyone is expecting some kind of explanation (which they won't), my excuse is studying for my entrance exam. I sat the BMAT on Wednesday and could not believe how tight the time limit was! Luckily, this time round I finished all the questions... Even if a lot of them were guesses... (Ellipsis)

Anyways, during this long period of muteness I have started a slight craze in my household for bread-baking. Oh yes, I have unleashed the taboo that is yeast.
The photos in this post are of my first successful white bread. (Call it a loaf if you wish)
It's suprisingly simple to make and came out with a nice crusty crust. (hehe)


On the subject of a crusty crust.. Has anyone seen the recent radox advert on television? Featuring the awesome hooky hook? Youtube it. Seriously.

Basic White Bread

Ingredients:
500g bread flour
1tsp salt
10g fresh yeast
250-300ml warm water

Method:
1) Rub the fresh yeast into the flour until it looks like breadcrumbs.
2) Stir in the salt, then gradually add the water.
3) Knead the dough until it becomes smooth and elastic (about 10 minutes)
4) Place it in a lightly oiled bowl and cover with clingfilm/damp towel. Let the dough rise in a warm place for about an hour until it is doubled in size.
5) Punch out the gas in the risen dough and shape it. Cover and let rise for another 30-40 minutes.
6) Use a sharp blade to make slashes on the surface of the dough. Bake in a preheated oven at 200 degrees C for 15-20 minutes until golden brown. (For extra crustiness, spray the oven with water to produce a little steam before baking)
7) Take out the loaf. (duh) To check whether it is done, tap the underside. If it sounds hollow, it's done. Cool and dust with flour.

Wednesday, 29 September 2010

Tea loves Cake

It was dad's birthday last saturday and I had zero time for cake baking. But I made it the day after so maybe it's not toooo bad?
Making the actual cake was not problem at all. Straight forward stuff after a bit of practice.
Then came the decoration. Bear in mind, I have never made a cream covered birthday cake in my life (or as some know it: a typical chinese birthday cake).
My brilliant idea was to sprinkle cocoa powder over a happy birthday stencil. Then it died on meeee!! So to resolve this problem, I just threw a lot more cocoa powder on top.
Then I arranged the pearl sugar thingies into a "45". One was misplaced. So I thought I'd blow it off the cake. Cue cocoa powder explosion and the rest of the pearls running away. Gah!

But the end result wasn't devastating. The banana tastes just a little strange and browned after about 2 minutes. Plus the whole family loved it (and are definitely not just saying it to make me feel better)!
Here is my experiment with left over cream. Using pre-made pancake batter, I improvised on some cake rolls that we used to buy from the posh bakery in Alderley Edge. Not bad, eh?

My other bake was green tea shortbread (recipe thanks to Martha Stewart). Such a vibrant green. Unfortunately the matcha powder is masked by the strong butter taste... It is basically now green shortbread. Hmmm.


Hello Kitty's head! It was such an awkward cookie cutter to use. Hence the chipped ear and lines across the face. *sigh* I will name you Gangster Kitty.

Thursday, 16 September 2010

Paper-wrapped Sponge Cakes


Having finished my first ever driving lesson, I arrived home in a giddier-than-normal mood. Although I didn't travel faster than 10mph, it was exciting to be going faster than walking speed!
There was no stalling (unexpected) and loads of new information to remember...
How do all the drivers remember all this??

Anyhoo, I thought I'd express some happiness with a bake. I first tried paper-wrapped sponge cake at a bakery in china town. I immediately wanted to recreate the giant, soft, perfectly sweet sponge.

I found this recipe in a Chinese cooking book form Hong Kong (my holidays usually consist of at least one day of book-hunting). This wasn't my first attempt, and I remember my previous bake having a higher rise. Nevertheless, the cakes came out as spongey as a sponge :D
It even bounces back when you compress it! That equals triumph to me.


Paper-wrapped Sponge Cakes

Ingredients:
150g eggs
60g caster sugar
70g cake flour (I used 50g plain flour, 20g cornflour)
10g oil

Method:
1) Preheat the oven to 180 degrees C.
2) Separate the egg yolks and whites. Beat the egg whites on high speed until stiff.
3) Beat the egg yolks and sugar for 2 minutes until pale.
4) Fold the egg yolk mixture into the egg whites. Sift in the flour and continue folding. (Try to keep handling of the mixture to a minimum to prevent deflating)
5) Lastly, incorporate the oil into the mixture.
6) Spoon the batter into cake cases. Bake for 15-20 minutes until golden and risen.
7) The cakes are best served warm. Cool completely before placing in an airtight container.

Tuesday, 14 September 2010

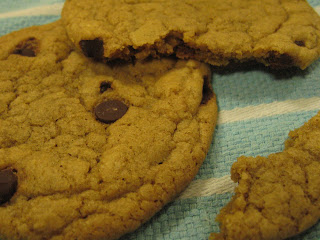
Chocolate Chip Cookies


I thought I'd begin with a classic recipe. As uncomplicated chocolate chip cookies seem, they are deceiving. What is a perfect cookie? There are so many different textures and tastes and ways to bake them.

But it seems the perfect cookie is all down to personal preference. In my opinion, CC cookies should be chewy. None of the crunchy, crumbly business. You know the kind that come fresh out of the oven at bakeries.

For me, this recipe is the definition of chewy cookies. Well, that is certainly the outcome. The only niggling thing was the lack of chocolate chips (although that was entirely my own fault for being stingy). It even got my dad and sister's approval! Now that is not a simple task, my friends.


Chocolate Chip Cookies

Ingredients:
250g bread flour

1/2 tsp baking soda
1/2 tsp salt
170g unsalted butter, melted
200g dark brown sugar
100g caster sugar
1 tbsp vanilla extract
1 egg
1 egg yolk
325g chocolate chips (yeh... I just threw a few handfuls in...)

Method:
1) Preheat oven to 170 degrees C.
2) Sift the flour, baking soda and salt together.
3) Cream the sugars and melted butter.
4) Add the egg, egg yolk and vanilla. Mix, mix, mix.
5) When combined, add the flour mixture, then fold in the chocolate chips.
6) Using two tablespoons, form balls of batter and place on a lined baking sheet. Make sure you leave room for spreading!
7) Bake the cookies for 15-17 minutes. You may want to rotate the baking sheet for even browning.
8) Allow the cookies to cool before storing them in an airtight container.